1805 Info 8h: John Henry Crompton
His death at Zonnebeke (3rd Ypres) - 4 October 1917
'It was a great battle and I have no desire to see another.' - Private James
Joseph O'Brien, 35th Bn. AIF on the battle for Broodseinde Ridge. Quoted in Clark,
Christopher, The Sleepwalkers - How Europe went to war, Harper, 2013
The German intention
In the aftermath of Polygon Wood, the acting GSO1 of the Australian 1/Division declared: 'It
cannot be expected that our next operations will surprise the enemy.' 1
Reflecting on their two defeats, the German Fourth Army and Ludendorff, who had travelled to
Roulers, made two crucial tactical decisions: first, defence in depth would be abandoned, and
second, a counter-attack would be launched. The policy of defence in depth was proving ineffective
because it simply made it easier for assaulting troops to advance because of the reduced
resistance offered by German infantry. As the attackers were advancing to a limited objective,
which was within range of their supporting artillery, there was less chance that they would be
overstretched and vulnerable to a counter-attack. Counter-attacks were not reaching the British
positions in sufficient time or strength to make an impact. Fourth Army advocated a return to a
continuous defensive line, where every piece of ground could be held in greater strength forcing
the British to fight for every piece of ground. As a result, the whole front- line battalion was
concentrated forward, with close support to the rear. They were, however, susceptible to
artillery.
After the failure of the 01 October local counter-attack, intent on recapturing the ground
lost on 26 September, a second was planned for 04 October with the 212/Reserve Infantry Regiment
opposing 11/Brigade. Hill 40, on Windmill Cabaret Ridge, was an objective, behind which the
Germans could assemble in relative safety. Their artillery and trench mortar barrage
commenced at 5.25, 35 minutes before the Australian Zero Hour, and fell on the British rear. In
the 11/Brigade area it fell on the 41st and 44th Battalions of the third and fourth wave. Both
were forced to move forward into the 42nd and 43rd Battalion areas to reduce their casualties. By
Zero Hour, the 44/Battalion suffered badly, with one company losing 50% of its men. Such was the
barrage that the 10/Brigade also merged with 11/Battalion behind Windmill Cabaret. At 6.00am the
Australian barrage opened up to begin the Australian offensive operations at Broodseinde Ridge
and silencing the German artillery. Haig believed that II ANZACS were fortunate that their
intense barrage had fallen on the Germans troop concentrations.
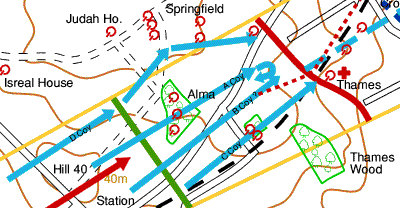
11th Brigade's objectives
On 18 September 1917, Major General John Monash, commanding 3rd Division of II ANZAC was to
attack south of Zonnebeke from the positions captured by 5th Division on 26 September, though
behind Windmill Cabaret Spur which the British had failed to capture. The 10th Brigade would take
the left flank and the 11th the right flank, each with a front of 400-600 yards. Even after
Lieutenant General Godley’s Corps conference, held the next day, two points were challenged by
Monash. Instead of a four-battalion penetration of 1500 yards, Monash argued for three battalions
attacking to a depth of 1150 yards, leaving one battalion in reserve in case of a counter attack.
2 Monash argued for a 4am zero hour to gain surprise and to avoid the regular German
dawn barrage but this argument was lost to the majority of commanders and zero was set for 6am.
As the 1st and 2nd Divisions has emerged from the Battle of Menin Road without too many
casualties, I ANZAC came to the right flank of II ANZAC for the attack on Broodseinde. This moved
3rd Divisions attack slightly northwards so that 11th Brigade now bounded by the Ypres-Roulers
railway a few hundred yards north of Zonnebeke and 2nd Division. With its right resting on the
railway, Monash's front stretched 1000 yards, behind Windmill Cabaret spur, which ran north-west
from Broodseinde to Dochy Farm.
This spur descended gently into the Hanebeek Valley, defended on its
western side by a chain of pillboxes, Israel, Judah, Alma and Springfield. Overlooking the
eastern bank of the Hanebeek were Bordeaux and Seine, two strongpoints on the slopes of another
spur, the Gravenstafel, whose crest left the Passchendaele Ridge 1900 yards from the Windmill
Cabaret. It was crossed by the Flandern I or Staden—Zonnebeke Line. The material strength of these
defences was increased many times over by the natural advantages the Germans enjoyed. The railway
swung diagonally across Monash's right, forming an effective switch line, and the entire Hanebeek
Valley could be commanded from several of its cuttings and embankments. Like the Windmill Cabaret,
the Gravenstafel curved to the north-west and from its highest point, the Abraham Heights, lay in
the New Zealand sector in Monash's left. 3
1805info8h, sheet 2
The two ANZAC Corps had adjusted their boundary to the Ypres-Roulers
railway with the New Zealanders and the 3rd Australian Division of II ANZAC to the west.
11/Brigade attacked directly to its west.
11th Brigade comprising of 41st, 42nd, 43rd
and 44th Battalions, of the 3rd Division, had the task of advancing
between 1,200 and 2,000 yards on a 1,000 yard front, in two stages: first across the
valley of the Nieuwe Beek to the 'Red Line' - 100 to 200 yards short of the crest
where Tyne Cot Cemetery now stands; and then, after about an hours pause, rushing the
crest and pushing forward to a 'Blue Line', 200 to 400 yards beyond Tyne Cot. As
the railway veered to the north before cutting through the crest Maj. Gen. Sir John
Monash added two intermediate objectives, making four in all, one for each battalion. The
42nd's objective was the 'Red Line'.
Right: 11th Brigade objective map
Click on the map to open an A4 map of the whole battlefield.This map is
orientated to the line of attack. The names are north orientated.
Above: Ariel view of Alma before the attack
Source: Bostyn 2007
1805info8h, sheet 3
The plan of attack
The plan of attack was for the 43rd Battalion to penetrate 700
yards depth, and while the barrage halted 200 yards beyond this point for 12 minutes, the
42nd Battalion was to leap-frog through the 43rd Battalion and penetrate a
further 800 yards to the Red Line, which ran across the railway line at D 22 b 25.65 southwards
through the T in Thames [D.16.d.5.5] and northwards to D 22 a 5.9. [Note: the maps are based on
those included in the Battalion Battle Narrative, which show different grid references.]
(42nd Battle Narrative in this font.)
'The artillery plan was changed to confuse the enemy. The Battle of
the Menin Road had been preceded by a week-long bombardment, while the Polygon Wood action had
only a twenty-four-hour preparatory bombardment. This time the artillery fire was to be laid down
at zero hour, when the troops were to advance, but a series of 'practice barrages' were
laid down from 27 September onwards. The plan of the barrage was also new. It would begin 150
yards (137m) in front of the jumping-off line and go forward in 100-yard (0.9-km) lifts until an
infantry pause line was protected. It would then wander forward 1,000 yards (0.9km) before coming
back to cover the advance to the final objective. Second Army had 796 heavy and medium guns and
1,548 field guns and howitzers to provide this barrage.' 4
This plan illustrates the increasing sophistication of the technological artillery war.
Thursday 4 October 1917
Temperature 60°F (15°C); overcast skies resulted in 0.18in (4.6mm) of
rain. 5 4 October 1917 dawned with another of those miserable rain-filled mornings,
filled with anxiety. The ground was wet and slippery; visibility was low; and a thick drizzle
saturated the air.13
Assembling behind Hill 40 and preparing to 'go-over'
By 5.30am most of the assaulting brigades were in their assembly position, the men laying out
in no-man's-land behind their jump-off tapes, bayonets fixed. 6
The whole Brigade formed up 43rd in front, 42nd, 41st and 44th in rear.
The front allocated was 500 yards from the Ypres to Roulers railway, inclusive, along a line
running N.W. The assembly position was very
broken, slippery and boggy and the
going was very difficult. By 3am of the morning of 4
October, all Companies reported ready for the attack. Battalion Headquarters was
established in a dugout at D 27 A 2 9. 7
On the right, [adjacent to the railway, the troops of the
42nd] were very close to the enemy. [...] [T]he night was quiet until shortly
before dawn. 'At about 5.20 – a yellow flare went up, instead of a white (as
heretofore. It was followed by a couple more and then a sheaf of them ... About seven
minutes later, the German barrage began to come down, battery by battery. By 5.30 it was
really heavy ... Of course we thought that the attack had been discovered. ...'
8
Above: Map of the planned attack Source:
TNA, Map October 1917 Ref: 28NE1 D.22.a 2.4
Click on the image to open a full A4 landscape map
1821info8h, sheet 4
German batteries began to fire in support of their pre-planned spoiling attack and shells
started falling on the forward positions of the Australians. Most of
the forward battalions suffered least; where there was room the rear lines edged forward to escape
the worst of the storm. Most of the men, lying in shell holes with waterproof capes drawn over
their heads against the rain, simply had to endure it. The Battalion attacked on a three Company
frontage, each Company taking 200 yards 'C' Company on right [towards Thames Bunker],
'B' in the centre, 'D'
on the left, and 'A' Company, in
reserve. Each of the Front Companies had 1 platoon extended to follow the
barrage, 2 platoons as Moppers-up and 1 platoon in reserve. The reserve Company moved in
Artillery formation. Zero hour was set for 6am.
Right: Sketch of the attack formation from the War Diary
In Artillery formation the platoon moves in a four section diamond, lead by the platoon
officer. The rifle section lead, (see bottom of illustration above) followed by rifle bombers on
the left flank and bombers on the right flank. The Lewis gun section brought up the rear.
The barrage was to fall on a line 150 yards east of our assembly line,
for three minutes, then advance 100 yards, lifts every six minutes. In order to frustrate a
possible enemy attack our Artillery, at 5.15am, put down an SOS barrage which moved forward three
hundred yards and remained down until zero hour.
The unit history 44th, who were crowded at the back of the assembly area, recorded:
'As the Australian guns were practically silent, the German troops on
their assembly positions must have had a quiet time. Not so the Diggers. The German barrage
started at 3 a.m. and from that time up to 6 o'clock the troops endured an ever-increasing
storm of high explosive shells, which literally showered on the area in which the Diggers were
crouching in shell boles, with no possible cover and only waiting the arrival of the 'one'
which must sooner or later fall in their particular shell hole. Casualties in the 44th were
numerous. 'D' Company lost fifty per cent, of its strength in those three hours, and the
other companies also suffered heavily. In addition, the usual Flanders drizzle drenched everyone
to the skin. Although under such circumstances the wetting was of minor importance, it was still
another of those proverbial straws which, however, never broke the Diggers' backs. Only those
who endured it can now imagine what the suspense was like.' 9
The 41st's unit history recorded:
'Half an hour after we arrived (5.30 a.m.) the Germans put down an
intense barrage, which fortunately fell mostly on the Zonnebeke and Bremen Redoubts in rear of us.
Rain commenced to fall steadily. In waterlogged shell-holes, all longed for the hour of action to
arrive. Prompt to the second, at 6 a.m. the British barrage dropped with the sound of thunder.
Perhaps never in the history of this war was there such a concentration of artillery in one place
as in the Ypres salient at this period. It was impossible to pick out the sound of any one gun;
the air was filled with a dull roar, and a scene such as Dante in his "inferno" could
not have imagined was unfolded. Stretching away on both flanks, further than the eye could see,
was nothing but pulsating waves of red and white and purple, belching forth a whirlwind of death
in front of our advancing infantry. After three minutes of this—Furies let loose—the gathering of
troops along the front moved forward, and we with them. The attack commenced in darkness.
1821info8h, sheet 5
In the Hades, all recognised formations went by the board, and
"columns of lumps" picked their way forward, recking (sic) nought of casualties caused
by the enemy barrage.' 10
... the enemy put his barrage down along the ZONNEBEKE-BREMAN REDOUBT
LINE. Our rear troops sustained a fair number of casualties during this stage, to avoid which they
moved forward up Hill 40 [Windmill Cabaret] until the whole brigade was crowded into a
depth of a 100 yards.
In the Official History of Australian in the War of 1914-1918, CEW Bean wrote:
'As if by coincidence a German attack had pre-empted that of the
Allies by 30 minutes.' 11
'An officer of the 43rd described [the barrage] as
like a wall of fire. The battalions of the 3rd Division followed it more or less in one
crowded line at the outset, the rear waves pressing upon the front ones in their haste to avoid
the enemy's barrage. The 43rd, which led the right brigade, met the Germans at once
from the crest of Windmill Cabaret ridge, [Hill 40],where this had not been seized on September
26th. On the right a machine gun opened up from a pillbox near Zonnebeke station, on
the left some posts threw bombs from the hill top. All were quickly suppressed. The Germans on the
crest fled.' 12
'As it happened Fritz had decided to attack the Australian positions
on the same morning (October 4), but he was 10 minutes too late, as his attack was timed to
commence at 6.10 a.m. His troops, among whom were the famous Iron Division, which was noted as
never having lost a trench or failed to take its objective, were assembling at the same time as
the Australians, and when both had completed their arrangements there were, unknown to each other,
two bodies of assault troops lying in some places with only fifty yards between them, and both
waiting for the dawn to fly at each other's throats.' 12
At 6am our barrage fell like a wall of fire, for about five minutes on
the appointed line and the whole Brigade rose as one man and moved forward.
The Prussian troops assigned to retake the higher ground south-west of Zonnebeke, found
themselves in the worst possible place and the worst possible time. Their attack had been
scheduled to go ahead at 6.10am, but as they were about to go forward, they were engulfed in a
nightmare of dust, smoke and shell splinters. 212 Reserve Infantry Regiment (RIR), which was to
has lead the attack, was torn to pieces. It sustained over 1,000 casualties that morning , with
reports indicating that some of the assaulting companies lost 95 per cent of their effective
strength.13
End notes:
Westermann p.76
Pedersen p.188
ibid p.190
Evans, p.106
McCarthy - all weather stats
Lloyd p.208
Grid references: D - 36 squares
of 1000 yards2, 27 - one square of 1000 yards2 divided into four
smaller squares, A - the top left 500 yard2 square in square 22 (C is the
bottom left square), 2 - 2 of 10 units along the base of square A, 9 - 9 of 10
vertical units up the 2 grid line.
Bean Vol. IV Chpt. XX p.842
Longmore, p.100
MacGibbon, p.62
Bean, p.842
Longmore, p.100
Lloyd, p.212
1821info8h, sheet 6
Over-the-top
When the attack barrage opened at 6 a.m., the assault had to commence as planned. Westermann
describes the infantry as 'fit, athletic men bent only on one thing — the extermination or
capture of the enemy.' 1 The rifle and bayonet team were to outflank and dealt with
the pill-boxes, whilst the bombers, rifle grenadiers and Lewis gunners provided protection. After
the Australian barrage neutralised the German counter-attack and its momentum, the counter
battery artillery subdued the German barrage which was falling on the British assembly area.
The first wave of 43rd Battalion combined small arms teams went over and had taken Hill 40 by
6.11am 2 to assault the intermediary Red Dotted Line behind a ‘wall of flame’
3 met the counter attacking Germans on the slope of Windmill Cabaret. The 43/Battalion
cut through the lines of dazed and disorganised German infantry, reaching their Red Dotted Line
objective by 6.20am: one battalion history recalling that 'dead, wounded and dazed Germans met
the view everywhere'. 4 A 'great number' of dead German soldiers had been caught
beneath the artillery barrage as they prepared for their own attack others were caught in their
tightly packed front line. To their right I ANZAC became involved in the largest bayonet fight of
the war. 5 By 1.15pm, Godley cancelled the New Zealand attack, forcing Monash to
abandon his fourth phase. 6
The 43rd Battn. reached its objective without difficulty.
The 42nd advanced behind the 43rd, in preparation for the second
objective. Two officers, 2/Lieut. WH Comper and 2/Lieut JP Kelly-Healy['D' Coy,
remembered on the Menin Gate] before Hill 40 was crossed.
At zero plus 41 minutes the 42nd Battalion leap-frogged through the
43rd and continued the attack. No resistance was met with and the fortified
orchard and Alma gave no trouble.
Here Sergeant CFW (Charlie) Harris, (Right) of 'D' Coy, assumed command
and gained his Military Medal, gazetted 'for bravery in the field'. Charlie
Harris returned to Australia in 1919 and his son, Ted, became webmaster for Digger-
History.
'After the short halt the right brigade went on in excellent
formation of section columns, the 42nd (Queensland) Battalion leading. Its right
crossed the railway and reached the second objective of the 'Red Line', at 07.20 hours,
after a little fighting.' 7
Between 6.29am and 6.41am, 8 the barrage halted allowing 42/Battalion
to reorganise before beginning their advance to the Red Line against the strong
points. Slowed by the swampy ground, they advanced loosing contact with the creeping
barrage. Very little additional resistance was met as the German infantry were 'only
too anxious' to surrender. Although large numbers of the enemy were encountered
along the railway line about Thames Wood they surrendered freely. 9 As
soon as they were relieved of their weapons and ‘souvenirs’ ‘they ran over to the
stretchers on which lay our wounded and stood in pairs at the end of each’.
10
Right: Zonnebeke landscape of 17 October 1917 AWM E01180
1805info8h, sheet 7
Both the 43 and 42/Battalions swept over the crest and into
the next valley, beyond which rose Gravenstafel Ridge. On the left there now occurred a
splutters of firing around a pill box (Israel House). German bombs were bursting ten
yards in front of the shooting Victorians, but a party could be seen working round
through a hollow. Resistance ceased and the line swept on.
right: A Map showing the 42/ Battalion's line of attack. Click on the
image for a full A4 landscape map.
The enemy kept firing Very (Verey)
light signals and his artillery kept shortening the range. He also heavily shelled Thames
Wood. We sustained nearly all our casualties at this stage. The 10th Brigade
on our left, lost direction and drew 'D' Company over to the left about 200 yards.
The ground was very marshy which rendered the going difficult and slow and the left
company fell 250 yards behind the barrage. The Reserve Company Commander, (Capt GA Dunbar)
acted promptly and threw his men into the gap. All went well and the left Company
regained their position.
Above: A section of a contemporary
aerial photograph of the battle field. Click on the image to open an A4 jpg of the
whole photograph with the Brigade objective superimposed. Note that Seine dugout has been
relocated to the map position.
In the Official History, CEW Bean records:
'The left, however, was quickly held up by fire from the
bed of the valley behind Alma. Perceiving that a dangerous gap had opened, the commander
of the reserve 'A' Company, Lieutenant [later Captain] Gordon Dunbar swung two
platoons across the front of Alma, filled the vacant space, and seized three pillboxes,
which if left, may have held up the whole central division.' 11
Right: The late owner of Alma Farm described the 'German bunkers',
which were destroyed many years ago. Source: Madame Emiel Vanlerberghe Berghof
Alma
1805info8h, sheet 8
Above: The signal, referring to Lieutenant Dunbar's action '...they
advanced ... moving to ALMA ... 8:27am from Hill 40 Source: 11th Brigade War Diary,
TNA, Kew, WO 94/2761
Above: A line drawing of a fortified farm such as Alma or
Springfield Source: Andy Gammon in Barton 2007
Large numbers of the enemy occupied the dugouts East of THAMES WOOD along
the RAILWAY LINE, but they did not fight and surrendered readily.
Our objective was reached on time [7.20am], protective posts were at once
put out and the work of consolidation began. The barrage halted 200 yards beyond the Red Line for
47 minutes and during this period a large number of prisoners came in. Altogether about 100 were
captured by this Battalion all in this area.
The block house at D 22 b 36 12 [Thames] was an AID POST
and the whole medical staff was captured. This dugout also contained a machine gun. [On 11
October 1917 9/Australian Field Ambulance (AFA) used Thames Bunker D16.d.5.5 as one of their five
Regimental Aid Posts (RAP)]
Nine enemy machine guns were captured altogether, four of which
were new and did not appear to have been fired from. The enemy had evidently been consolidating
on the high ground in front of our RED LINE as many half finished positions were discovered.
1805info8h, sheet 9
The consolidation of the RED LINE was commenced on the following plan.
Each Company put out two Lewis Gun posts, 100 yards in front; these posts were manned by the Lewis
Gun teams and two snipers.
Each Company also put down two Platoon positions on its front and each
post being about 30 yards long. Three platoons of the reserve Coy, (one to each front line Coy.)
helped with this work for two hours by connecting up the posts. The fourth platoon of the Reserve
'A' Company dug in on a line 130 yards in the rear of the RED LINE and after two hours
other platoons of the Company came back and also dug in on this line.
The ground was very wet and shell-torn, which rendered
the work very difficult; but in two hours, the men were under cover.
According to Australian Red Cross witnesses, this was when John Henry was wounded.
Right: Map of Alma Farm showing the approximate positions of John Henry's
injury and burial Source: Trench map October 1917 Ref: 28NE1 D22a 2.4 TNA WO 297/718
The Reserve Line where John Henry was wounded
First obelisk on the Australian walk
John Henry killed and buried here or here
Soon after the attacked started the advancing troops met groups of German prisoners coming in.
They were quickly relieved of weapons and souvenirs.'
As soon as they were released they ran to stretchers on which lay our wounded and stood in pairs
at the end of each.' 13 This describes John Henry's evacuation.
The work of the evacuation of the wounded, by the long heavy carry and
the enemy barrage kept down for four hours after zero.
During the afternoon and night of the 4th the enemy also shelled our
consolidation line, the RAILWAY LINE, HILL 40, and the ZONNEBEKE LINE.
On the Red Line
The 42nd reached their 'Red Line' objective at 07.23 hours.14
The attack halted until 8.10 for the battalions attacking the summit to reorganise; but this
pause saw some of the hardest fighting of the day.
As the barrage reached the Red Line the left-hand gun of each battery fired smoke shells for
five minutes. The artillery’s creeping barrage then lifted to form a protective barrage 100 yards
in front of the objective between 7.23am and 8.10am. 15 There was plenty of time
to and space for the 42/Battalion to consolidate their objectives and establish strong points
protected by wire, before the 44/Battalion began the next phase of the attack by leap-frogging
through the 42/Battalion to the intermediate Blue Dotted Line, which commenced at 8.10 am.Their objective lay to the east of the railway at the foot of the ridge.
It is thought John Henry was wounded at this point, enough to be carried to the rear by German
prisoners. The Australian Red Cross gives two witness accounts: reports vary from a gunshot wound
to the left shoulder to shrapnel in the chest/thigh whilst digging a trench. Pte. Haines reports
'He was buried on the right hand side of the railway line going up to Passchendaele.'
That he was digging a trench confirms he was on the Red Line at the time. Either wound is
possible.
1805info8h, sheet 10
The shell splinter could
have been caused by a fall-short from the Australian supporting battery or the German
defensive shelling. Had John Henry been recovered and not killed by a subsequent
barrage the carry from the RAP to the intermediate post meant the stretcher-bearers
carrying their burden over the same difficult terrain experienced by the troops
moving to the front line. By midday, 314 stretcher cases had moved through II ANZAC
Corps advanced dressing station, most suffering from wounds caused by high explosives
Right: Zonnebeke road making after the battle 15 October 1917 Source:
AWM E01045
Above: 9AFA evacuation map that John Henry would have
followed with Alma Farm designated as the first Regimental Aid Post (RAP) and the
Advanced Dressing Station (ADS) located in Ypres Prison. Various relay posts are
indicated for stretcher and/or motor/ horse ambulances. Source: 9/AFA War
Diary
1805info8h, sheet 11
Advanced to the Blue Line
The two brigades, advancing with all four battalions one after the other, had experienced
difficulty maintaining formation causing considerable confusion on the Red Line. The waterlogged
and impossible ground forced 40/Battalion of 10/Brigade to drift right in to 42/Battalion area.
During the halt on the Red Line the company commanders swiftly moved to reorganise their
companies.
At 8.10am, after four minutes of intense artillery fire, the barrage moved forward
again, and 44/Battalion left the Red Line reaching their Blue Dotted objective of
Daring Crossing at 8.25am. 16 The history of the 39th Battalion called it a
'wonderful barrage ... [t]he ground in front began to spurt up like geysers, overhead
shrapnel was bursting and in a good heart the men went forward’. 17
41/Battalion reached the Blue Line at 9.02am 18 and began to consolidate
and strengthen protected by a barrage of reducing ferocity being put down 200 yards
ahead until Zero plus 401. 19 Within this area mopping-ups parties cleared
the ground and established machine-gun out posts in preparation for the expected
counter attack. The right flank was counter-attacked at 6.30pm but again this was
broken by artillery. 20
Right: Daring Crossing 06 November 1917, AWM E01158
End notes:
Quoted by Westermann p.83
3/Div HQ War Diary AWM3 1/46/12 Part 2 p.20
Lloyd p.208
Quoted by Westermann p.84
Richard Holes in discussion with the author Chipping Norton lecture
3/Div HQ War Diary AWM3 1/46/12 Part 2 p.31
Bean 1941
3/Div HQ War Diary AWM3 1/46/12 Part 2 p.20
ibid p.31
HG Hartman’s diary, 4 October 1917 AWM38 3DRL 606/254/1 quoted in Lloyd p.209
The Flandern I Line ran diagonally across the ground. The right brigade encounter it at once,
crossing the old wire-entanglements in swampy ground north of the railway. German pillboxes along
the demolished trench brought machine-guns into action. The 44/Battalion was held up
by the Seine strong point until this was rushed by party of the 41st, who reached
their Nieuwemolen cross-roads objective, the key of the ridge. The 11th Machine Gun Company
established two guns which, with the Lewis guns of the 41/Battalion, swept the
slopes from Keiberg to the railway.
'... isolated concrete dug-outs, protected from shell fire and manned
by staunch machine gunners, held out, and each of these caused many casualties before they were
wiped out. These survivors did not hold up the general advance, and the spectacle then was lines
of casual Australians following the barrage with rifles slung, smoking cigarettes or
"souvenired" cigars. If a machine-gun opened there was a converging rush on to it. A
machine-gun post was always good for a few first-class revolvers and various pairs of field-
glasses. Under these "picnic" conditions the advance went on, and, "according to
plan" by 10 a.m. Broodseinde Ridge [Flemish pronunciation: Brodesayda - literally Bread End]
was taken and was being consolidated by the 41st Battalion with the 44th three hundred yards in
rear as supports.' 1
'Although actually our share in the fighting was not to commence
until the other three battalions had captured their objectives, our more adventurous spirits
pushed forward with the leading waves, and participated in all the fighting that came their way.
All opposition was completely overcome. By the time the memorable Hill 40 was left behind, the
majority of the men going forward were smoking German cigars, taken from "pill-boxes".
[...] At the second halt of the barrage, to enable the 42nd Battalion to consolidate, four of our
men, unmindful of the drama being enacted before their eyes, were seen sitting in a shell-hole
playing "show-poker" for souvenired coins. The first two objectives were taken by the
43rd and 42nd Battalions.
After the second objective was passed the "
going" was very bad, especially north of the railway line. In a quagmire of mud knee-
deep and tangled barbed wire, we lost the barrage, and after very heavy losses carried the
objective at the point of the bayonet. [...]One will remember vividly our line above Dash
Crossing, where lies that gallant and ever-cheerful soldier, Captain J. Redmond, who was
killed by a shell after consolidation was completed. Astride the railway on the left with
the Lewis gun post in the cutting, 'D' Company had their
Above: Aerial photograph of Tyne Cot 16 June 1917
1805info8h, sheet 13
position. Along the ridge, amid old Boche trenches, ran 'C'
Company's line, with 'A' Company on its right. 'A' Company's sector included
a road junction, with signboards still intact, and they also had a platoon from the 26th
battalion in their midst. Soon after this line was taken the Germans massed for a counter attack,
but before it could be launched a party consisting of men of 'B' and 'C'
Companies, under Lieutenant Skews, by a brilliant bayonet charge routed them. Unfortunately that
brave officer was killed, and Lieutenant CH Butler, who went forward to recover the body, wounded.
Through out the day, repeated counter attacks were made, the cemetery on
the left flank being the favourite, and one might say the appropriate, spot to assemble in. All
efforts were frustrated by Lewis gun, rifle and trench-mortar, fire and for the attack, which
assumed larger proportions, we called in the aid of the artillery with the S.O.S rocket - red over
green over yellow. 2
The 39th Battalion, to the left of the 44th, were held up by machine-gun fire from pill-boxes
in the New Zealand Division's area, but these were dealt with by the 40th Battalion, who were
in support. They went on and were forced to storm Hamburg Hill and consolidate. Sgt Lewis McGee
of the 40th battalion, killed on 12 October, was awarded a Victoria Cross for this action. He is
buried at Tyne Cot.
Before the 'Blue Line' final objective for the first day, lay three substantial German
concrete pill-boxes in what is now Tyne Cot Cemetery. Capt Clarence Smith Jefferies of the 34th
Battalion was killed during the taking of the right-hand Tyne Cot pill-box and was awarded a
Victoria Cross. He is buried at Tyne Cot. The middle, particularly large pill-box was used as an
Advanced Dressing Station after its capture and was later incorporated in the Cross of Sacrifice
and a 3rd Division memorial. Note the correction to the lettering on the memorial.
Friday 5 October 1917:
Temperature 52°F (10°C). 50% cloud cover and showers brought 0.12"
(3.1mm) of rain.
Saturday 6 October 1917:
Temperature 52°F (10°C). 50% cloud cover and showers brought 0.08"
2.1mm) of rain.
At 9am, on the morning of the 6th the battalion was relieved after sixty
hours in the line. Our casualties were 4 officers killed and 7 wounded, Other Ranks. 220
killed and wounded.
1805info8h, sheet 14
A contemporary account
Along with his iconic photograph, taken 12 October 1917, Captain Frank Hurley Official
Photographer of the Australian Imperial Force, narrates a vivid account of the Zonnebeke to
Roulers railway.
… Here we got on to the Zonnebeke railroad which has been
shelled and blown to fragments during the past two years of straffing (sic). It is now
a raised bank of mud and bits of scrap iron rails. Already we are starting to rebuild it,
and about 1000 labourers were at work rail-laying. It will be of incalculable value to
support the front lines and artillery, as the roads will be impassable during the winter.
It's a bloody work, however, for it is being constantly shelled and numbers are daily
being killed.
Above: Australian troops sheltering in their funk holes, sharing the
Zonnebeke to Roulers railway cutting with the dead of perhaps, 12 October Source:
Hurley, AWM E03864
It is littered with bodies both of our own men and Boche. Things were
reasonably quiet till we got near to Zonnebeke - But the mud! Trudge, trudge — sometimes to the
knee in sucking, tenacious slime - a fair hell of a job under ordinary conditions, but with a
heavy camera up and being shelled, I hardly thought 'the game worth the candle'. Nearing
Zonnebeke we got into the Boche barrage, and as he was paying particular attention to the railway
line (or rather what once was), it being the only possible means of communication with the front
line about here: we had more than an exciting time. Shells lobbed all around and sent their
splinters whizzing everywhere — God knows how anybody can escape them, and the spitting ping of
machine gun bullets that played on certain points made one wish he was a microbe; under these
conditions one feels himself so magnified that he feels every shell Boche fires is directed for
his especial benefit. This shelled embankment of mud was a terrible sight. Every 20 paces or less
lay a body.
Some frightfully mutilated, without legs, arms and heads, and half
covered in mud and slime. I could not help thinking as Wilkins and I trudged along this inferno
and soaked to the skin, talking and living beings, might not the next moment one of these things
— Jee — it puts the wind up one at times. We pushed on through the old Zonnebeke station (now
absolutely swept away) up to Broodseinde and entered the railway cutting near the ridge crest.
Shells began to fall just about a hundred paces ahead and their skyrocket-like whiz, without
cessation passing too close overhead and bursting all around, induced us to retire. The light too,
failed, and rain set in. We got no pictures but whips of fun. I felt great admiration for the
stretcher bearers, who slowly plodded on with their burdens, trudging through mud and presenting a
tempting target, for the enemy observation balloons had eyes on everything. It was impossible to
bring in many wounded under these conditions, and many poor devils must perish from exposure. I
noticed one awful sight: a party of ten or so telephone men all blown to bits. Under a
questionably sheltered bank lay a group of dead men. Sitting by them in little scooped out
recesses sat a few living; but so emaciated by fatigue and shell shock that it was hard to
differentiate. Still the whole way was just another of the many byways to hell one sees out here,
and which are so strewn with
1805info8h, sheet 15
ghastliness that the only comment is, 'That poor beggar copped it
thick', or else nothing at all. Our fellows, 3rd Division and the New Zealanders, obtained
their objective, Poelcappelle, but were driven out again. We captured a number of prisoners though
not many. We left the embankment near Zonnebeke Station and took to the Duckboards for home. These
slippery slidy ways are the only possible routes over a vast slough of rain filled shell craters.
It took me two hours solid walk to return and it was not until we actually got on the Menin Road
and clambered on a passing lorry, that we felt we had once again cheated the Boche of his wishes
and intentions. 3
Casualties
Comparing casualties to the ground won, Messines had cost the 3rd 323
men per yard and Broodseinde 93. The corresponding figure for Passchendaele was 35-54.
4
As a result of Broodseinde and Passchendaele attack on 10 October, on average, each of Monash's
battalions was 400 under strength: an insoluble reinforcement problems. 5
The Battle of Broodseinde was a fine achievement but cost the three
Australian divisions involved 6,432 men. In return, 4,158 German prisoners were processed by the
Corps cages and Casualty Clearing Stations. 6
The losses of the 11th Infantry
Brigade, killed and wounded, at Broodseinde were:
Officers
Other Ranks
41st Battalion
9
248
42nd Battalion
13
210
43rd Battalion
6
178
44th Battalion
13
193
11th Machine Gun Coy
1
18
11thLight Trench Mortar
0
8
TOTAL
41
855
Click on the Acrobat icon to open the 42nd Battalion's War Diary for October 1917
Source: Australian War Memorial October 1917
1805info8h, sheet 16
The Generals write
Major General Sir John Monash was delighted. He jotted a hasty letter:
‘We have had a magnificent success … A fine bag of prisoners is pouring
in. All are most elated, particularly the fine feat of pulling off so big a job with only three
days for our local preparation.’
After the 3rd Division had been relieved on the morning of 7 October, [the optimistic]
Monash wrote again, at greater length, looking forward to the next operation:
'Great happenings are possible in the very near future, as the enemy
is terribly disorganized, and it is doubtful if his railway facilities are good enough to enable
him to re-establish himself before our next two blows, which will follow very shortly and will be
very severe. My next objective will be Passchendaele, unless the 66th succeed in getting so
far in the next battle. . . . Our success [on 4 October] was complete and unqualified. Over
1,050 prisoners and much material and guns. Well over 1,000 dead enemy counted, and many
hundreds buried and out of reach. We got absolutely astride of the main ridge. Both corps and
army declare there has been no finer feat in the war.' 7
Monash was too optimistic for, when the 3rd Division again entered the action on
11/12 October at First Passchendaele, Monash expected them to carry Passchendaele village with an
advance of 3000 yards (2750m). As a result of boggy ground and enfilade machine gun fire from
Bellevue and Crest Farm, the Australians advance about 1000 yards (900m). It was left to the
Canadians to take the village on 6 November 1917 and to secure the high ground beyond four days
later.
In his memories Erich Ludendorff, Quartermaster General and effectively joint head of the
German Army, made this observation:
'The infantry battle commenced on the morning of the 4th. It was
extraordinarily severe, and again we only came through it with enormous loss. It was evident the
idea of holding the front line more densely, adopted at my last visit to the front in September,
was not the remedy. I now followed my own judgement without asking for further outside opinions,
and recommended the Fourth Army to form an advanced zone, that is to say, a narrow strip between
the enemy's front line and the line which our troops were to hold by mobile defence. The enemy
would have to cross this strip in making his attack, and our artillery would have time to get
onto him before he could reach our main line of resistance. The great difficulty lay in
withdrawing the garrison of the advanced zone in case of attack, and in bringing the artillery
barrage back to our own line.' 8
Conclusion
In total the 11/Brigade lost 31 officers and 610 other ranks 9 of which the
42/Battalion suffered five officers killed and 220 other ranks killed and wounded. 10
The Germans, who had been holding the Flanders I Line in vastly increased strength had suffered
heavily and had lost one of the vital positions, despite knowing that an attack was coming.
11 Ludendorff wrote that Broodseinde had been a severe battle, that they had come
through it only with enormous losses and heavily manning the front line was not the solution.
6 Consequently, the attack of 10 October faced defence in depth.
Westerman writes that Haig could be proud of what had been achieved that day. 12
However, Lloyd contends that Broodseinde did nothing to resolve Haig’s strategy as they drove
towards Passchendaele. The British attacks were getting narrower as they drove towards the high
ground creating a dangerous salient with its associated enfilade fire.
Lloyd argues that Broodseinde deserves to be recognised as a major success: the high point of
the Third Ypres campaign and a victory in excess of Polygon Wood and Menin Road. According to
Charles Bean it was one of the most decisive and ‘cleanest’ victories ever won on the Western
Front, and one moreover that has never been recognised except by the commanders and forces that
took part. An ’overwhelming blow’ 13 had been struck and both sides knew it.
Broodseinde was the third strike in fifteen days, driving the Germans away from one of their most
important positions in the salient, and doing so with the full knowledge it was coming.
14
There is a sense that the attack on Passchendaele should have been called off after
Broodseinde. They had already won a victory and had captured the Gravenstafel Ridge, which was
only 10m lower than the last rise before Passchendaele. In view of the worsening weather, the
army had its defendable dry winter line.
1805info8h, sheet 17
End notes
Longmore 2010, Page 101
MacGibbon 2010, p.63
Captain Frank Hurley, Official Photographer, Australian Imperial Force in Barton 2007,
p.345
Pedersen p.203
ibidp.204
Bean, 1941
Evans, pp. 112/113
Ludendorff, E, 'My War Memories, Volume 1', Hutchinson, London, 1929 quoted
in Evans, pp. 112/113
3/Div HQ War Diary AWM3 1/46/12 Part 2 p.32
42/Battalion War Diary AWM4 23/59/12 Part 2 p.2
Lord Birkwood, The Khaki and the Gown. An Autobiography, Ward and Locke, London, 1941,
quoted in Lloyd p.213
Westerman p.135
Charles Bean quoted in Westerman p.135
Bean, CE, The official History of Australia, vol IV pp.833, 875, quoted in Lloyd p.215
1805info8h, sheet 18
Post mortem
Lt. Col. AR Woolcock, Commanding Officer of 42nd Battalion, described the battle in
a letter to the parents of Lt. Morris Hart, No. 3 Platoon, 'C' Company, killed in action
in the area of Thames Bunker on 4 October 1917. The name of Morris Hart is also recorded on the
Menin Gate.
France,
November 2nd, 1917
Dear Mr. Hart,
It is always a hard job for me to write to parents and wives, sometimes, of my Officers
who have paid the supreme price, made the ultimate sacrifice, and so it is now, when I
write to convey to you and Mrs. Hart the sympathy of the battalion and myself in the loss
of your son Morris. As no doubt you have been officially informed he was killed in action
on October 4th, gallantly doing his duty. It may be of comfort perhaps for you to know
that I reckoned him one of my most promising subalterns, that he was popular with his men
and his brother officers, and that he showed a fine type of courage and the best
qualities of leadership.
On October 4th the battalion took part in the big attack, and were bound for the second
objective, a penetration of some 1000 yards. Other battalions went through us and as you
have read the operation was most successful. C Company, your sons Company, was on the
right flank, and had a fairly difficult job. At the assembly one officer was wounded and
early in the advance the second platoon leader was killed; the Company Commander Capt. J.
Leshy (who has I understand already written to you) was kept behind having to pilot these
to leaderless
platoons through rather broken country, and Morris for some time thought
himself to be the sole remaining officer of the company, and took hold accordingly, and
handled the situation extremely well. Had he survived I should certainly have recommended
him for the Military Cross. However he was killed by a fragment of shell and is buried on
the battlefield.
I have notified the Graves Registration Unit of the map location of his grave, and
will risk censorship regulations to tell you it is East of Ypres and East of Zonnebeke,
near the Ypres-Roulers Railway.
His personal belongings have been sent through the usual channels and I hope you will
receive them in due course.
You will pardon me for not having written sooner, the last month has been somewhat crowded
and strenuous.
Again offering you our sympathy in your sorrow.
Yours sincerely,
(Sgd) A.R.Woolcock
Source: Family letter of Robin B. Hart AM, Morris Hart's nephew, whom I met at
Tyne Cot on 04 October 2007. With permission.
Note: In World War 1 the Military Cross could not be awarded posthumously.
1805info8h, sheet 19
Contemporary photographic evidence
Click on the camera to open a contemporary photograph, with the original
descriptions - positions approximate.
The battlefield today
Today's Institut Georgaphique National 1:20 000 map 28 3-4, Zonnebeke-Moorslede,
places the same farm house at 994 365. Though internally a modern residence, it remains
similar to that rebuilt after the War. I believe that the rebuilt house took the pre-war
footprint.
To the left of the house is a farm drive to the rear of the property, now shaded by trees.
The dense Alma Wood abuts the farmyard boundary.
To the right of the house a new farm building bounds an open courtyard, beyond which are
areas for exercising horses. Beyond that, the grazing land over which 'D' Company
fought.
Above: Alma Farm as it was rebuilt in the 1920s: believed to
be similar to the house destroyed by warfare.
Although there have been slight modifications to the road system those that existed in 1917 can
be identified. The trench map for October 1917 shows the house and wooded enclosure of Alma at
reference 28NE1 D22a 2.4, 750 yards due north of Zonnebeke church. Alma Forest has grown to be a
dense wooded area. On 4 October 2007 the farmland comprised of pasture and maze. Near Springfield
Farm a gate-way hollow, full of water, gave an indication that the land was still wet, but nothing
like it was in October 1917.
1805info8h, sheet 20
Above: The battlefield today taken showing the slope of
Hill 40 (right) down to the swamp lands of the Nieuve Beek drain. It is possible that
'D' Coy, of the 42nd, attacked deviated through field tinged blue.
The 38/Battalion of 10/Brigade, attacked over the grass area.
Author: 04 October 2007 Click on the photograph to open a panorama taken from Israel House, showing
Hill 40 to Tyne Cot Cemetery.
Above: A 2007 aerial photograph of the battlefield Click on the map to open a scalable pdf map in a new window
1805info8h, sheet 21
Key to the modern photographs - Click on a camera to open a larger image,
generally 700 x 525 pixels.Author: 04 October 2007
The assembly point for the 11th and 10th Brigade, who crammed into
this hollow behind Hill 40, below the 20m contour.
The reverse slope of Hill 40, taken from the 25m contour, showing how little shelter there
was. The modern bungalows are at 35m, with the Langemarck road beyond them.
Hill 40 on the Zonnebeke to Langemarck road, taken from the area of the old station on the
30m contour. The blue car, in the road, is on the position of the old railway crossing.
Albertstraat, the road to Alma farm begins in front of Tegel, Tuin en Terras.
Zonnebeke Station is recognisable in its rebuilt form and now houses the fire station.
The modern Alma Forest taken from Albertstraat.
An observation pill box that remains in the grounds of Alma Farm. The concrete cylinder,
built on a solid base, has a metal door, facing away from the British lines, but no weapons
slit facing the advancing enemy.
The land over which 'D' Coy attacked, taken from the rear of Alma Farm courtyard.
Professor Richard Holme to the author in discussion several years before his death
Alma Farm House, now Albertstraat 22, on 4 October 2007. Building extensions have taken
place.
The start of the Australian Walk marks the location where John Henry was killed and
buried. The course of the railway is now a tarmac walk. Note how the line of the track swings
to the left in order to negotiate the gradient to the Passchendaele ridge at 55m.
One of the two possible sites for John Henry's burial taken from the start of the
Australian Walk.
The remains of Thames Bunker, once the Aid Post adjacent the railway line, now
the Australian Walk 04 October 2017.
Seine Bunker once stood behind the wire fence, at this T junction.
Daring Crossing, showing the red tarmac of the railway track and Australian Walk.
Dash Crossing marking the limit of advance for 41st Battalion. The red tarmac,
bollards and obelisk mark the railway and the Australian Walk. The white dome marks the
position of Tyne Cot Cemetery and the objective of 40th Battalion, 10th
Brigade.
The red tiled roof of Springfield Farm, captured by 38th Battalion, taken from
Israel House, with Tyne Cot Cemetery and the Passchendaele Ridge on the horizon.
From the Tyne Cot left blockhouse, one of the three captured by 40th Battalion,
looking back toward Alma Farm over the land taken by 11th Brigade.
Looking back to Hill 40 from Tyne Cot Cemetery.
1805info8h, sheet 22
Hoverbox Photo Gallery - The Red Line - Author: 04 October 2017
This feature does not function correctly on phones and tablets
This feature does not function correctly on phones and tablets
1. The Australian Walk 3. Bunker remains looking towards The Walk
2. Steps leading into the Bunker 4. Robin Hart and his wife paying their respects
1
2
3
4
Hoverbox Photo Gallery - Thames Bunker 1917 - Source: AWM
This feature does not function correctly on phones and tablets
1. Thames Bunker 6 November 1917 AWM E01251 3. Zonnebeke bunker along side the railway AWM C04575
2. Thames House AWM C04581 4. Seine House believed to be a German Headquarters AWM C04582
1
2
3
4
The Ypres to Roulers railway, once derelict, has gained a new lease of life
as the 'Road to Passchendaele Australian Walk 4 October 1917': a historic walk
devised by the
Memorial Museum of Passchendaele 1917, based in Zonnebeke. The Museum has
collected 24 biographies of soldiers who died in the area, and eight biographies of
survivors. These will make the basis for historical re-enactments along the attack line of
the 42nd Battalion.
Right: Obelisks mark the Australian Walk along the Ypres to Roulers railway. This
is the closest to where John Henry was believed to have been first buried.
42nd
Battalion War Diary October 1917AWM4 23/59/12 Originally with thanks to Grey Lynch of
Canberra, whose great uncle 2nd.Lt. James Patrick Kelly-Healey, of ‘D’ Company, 42nd
Battalion, was Killed in Action 4 October 1917 on the reverse slope of Hill 40 and is
remembered on the Menin Gate. (Accessed: 06 February 2020)
Bean CEW, 1933, 'The Official History of Australia in the War of 1914-18, Vol. IV,
AIF in France 1917', Chapter XX Third step – Broodseinde pp 833, Angus &
Robertson, Sydney, 11th Edition 1941
Brahms Vivian, 1938, 'The Spirit of the Forty-Second: narrative of the 42nd
Battalion, 11th Infantry Brigade, 3rd Division, Australian Imperial Forces, during the Great
War, 1914-1918', Brisbane: W.R. Smith and Paterson (printers), Published for the 42nd
Battalion AIF Association, Reprinted: The Naval and Military Press, Uckfield, 2010
Evans, Martin Marix, 'Passchendaele The hollow victory', Pen and Sword,
Barnsley, 2005
Green FC, 'The Fortieth - a record of the 40th Battalion AIF', Reprinted:
The Naval and Military Press, Uckfield, 2007
Hart, Robin B, AM, 'Visit to the Battlefields', published privately, 2007
Keow, AW, ‘Forward with the Fifth’, Naval and Military Press, Uckfield, East
Sussex, Reprinted 2009
Lloyd, Nick, Passchendaele, a new history, Penguin, London, 2017
Longmore, Captain Cyril, ‘Eggs-a-Cook the story of the Forty-Fourth, War – as the
Diggers fought it’, Colortype Press, Perth, 1921 Reprinted: Naval and Military, Uckfield,
Sussex, 2010
Imperial War Museum (IWM), Photographic Archives, London.
McCarthy C, 'Passchendaele: The day-by-day account', Arms and Armour,
London, 1995- weather reports
Trench map, 'Zonnebeke 28NE1, Edition 7a, 08 September 1917', WO 297/718,
The National Archives, Kew, London
Westerman, William, The Battle of Broodseinde Ridge, Australian Army Campaign
Series - 21, Canberra, 2018
This page was created by Richard Crompton
and maintained by Chris Glass