1805info8g for John Henry Crompton
Ypres and the approach march - 25 September to 3 October 1917
Haig's grand plan
The Ypres Salient had penetrated the German front since 1914. It presented both opportunities
for attack and, in view of the fact that the Germans held the strategically important high ground
of a horseshoe of low ridges, counter attack.
At the time, the pressure on Field Marshal Haig was huge.
The French were under pressure after their April losses and mutinies at the Chemin des
Dames. Mutinies put the French army in a state of near collapse and the Russian alliance
was questionable.
In the grand plan Haig imagined this to be the ideal location for the cavalry break
through to the U-boat bases at Bruges, Ostend and Zeebrugge, then threatening the
cross-channel shipping.
Haig saw the Gheluvelt Plateau and the Mid West Flanders Ridge - low ridges of between 40m
and 60m as the key to the whole area. Passchendaele had to be taken to prevent the German
army from seeing the planned build-up. Once taken, the German communication system in
Belgium and the industrial base in the Ruhr would be and threatened.
The British evolved 'bite and hold' tactics: troops attacked a limited objective,
consolidating gains protected by the artillery, before tackling the next objective. The
Battle of Broodseinde, on 4 October 1917, preceded the attacks on Passchendaele.
II ANZAC Corps, 11th Brigade and 42nd Battalion were part of Gough's Fifth Army
attack at Zonnebeke (Zonabayka), about 1 250m from Passchendaele,
Above: The towns and battles of the Ypres Salient 1917
The Strategic Background
As the successful but costly Battle of Polygon Wood drew to a close on 26 September 1917, seven
divisions prepared for the next step, the attack on the village of Zonnebeke, which became known
as the Battle of Broodseinde. At the end of the day, the British were almost on their 1915 line.
After Nivelle’s costly defeat and failure on the Chemin des Dames both the French army and
government were in disarray. In Russia, Tsar Nicholas had been over thrown with the Russian
participation in the war thrown into doubt. Germany, having endeavoured to avoid a war on two
front, could now concentrate of its western front: bolstered by unrestricted submarine warfare.
Whist the Entente waited for the arrival of US troops, it was left to the British and Douglas
Haig to continue offensive operations by taking over more of the front line from the French.
Prime Minister Lloyd George argued unsuccessfully that if the British army was so important to
the Western Front, it should not partake in a major offensive that would reduce its strength,
whether it succeeded or failed. If the British Army was to keep up the offensive, Haig was keen
for this to take place in Flanders, during the summer. Apart from freeing neutral Belgium, one of
the causes of the war, Haig argued for ending the U-boat threat of the Belgium coastal ports.
Operational Execution
As with the Somme, there was tension between Haig’s grand plan and his subordinates, Plumer
and Horne 1. Both men had conducted reasonably successful but limited set-piece
operations at Messines and Vimy respectfully. With the capture of the high ground at Messines,
the fighting could focus on relieving Ypres. However, for logistic and artillery reason, the
Ypres offensive could not immediately follow Messines. The weather intervened and the Gheluvelt
Plateau needed to be captured. I and II ANZAC Corps would make the main assault against
Broodseinde Ridge.
1805info8g, sheet 2
The Third Ypres Offensive Commences
The Third Battle of Ypres began on 31 July with the limited objective of Pilckem Ridge, which,
due to ‘thin’ artillery, was not the complete victory Haig and General Gough had hoped. When
Pilcken Ridge ended on 2 August 1917, the rains came down. Westhoek Ridge was captured and two
months later Langemarck, in a battle that lasted until 18 August and ending the first phase of
Third Ypres. After the cancellation of the next phased, planned for 25 August 1917, due to a
German counter-attack and bad weather, Haig reorganised. Plumer’s Second Army then took the lead,
with Plumer arguing successfully for a postponement of three weeks to reorganise his guns before
a limited objective attack of 1500 yard steps – the limit of the artillery cover and the
limitation of the necessity to rebuild roads and tracks.
The Divisional Conference
Plumer’s Second Army was to undertake the Battle of Broodseinde. It was essentially an ANZAC
attack with I ANZAC on the right and II ANZAC, which included Monash’s 3/Division, on the left.
The Corps boundary was generally the Ypres to Roulers railway line. The 11/Brigade were to attack
to the left of this Corps boundary.
Lieut. General Sir Alexander Godly, commanding II ANZAC, informed 3/Australians on 24
September that, depending on the results of Polygon Wood, they were likely to relieve V Corps in
an attack on 04 October 1917. On 27 September, Monash, because his division had not experienced a
recent battle, began to issue a series circulars to avoid his prescriptive Operational Order.
Brigade commanders would attack at ‘ZERO according to the best tactical methods available to
each of them.’ 2
The Infantry Plan
The divisions of II ANZAC Corps had a frontage of 1000 yards but, being the stronger Corps had,
at 1800 yards, further to penetrate than other divisions. The 3/Division, which had the furthest
to advance, had to move over marshy ground and through a number of fortified farms and strong
points. In general, Plumer’s attack was in two phases: phase one to the Red Line and phase two to
the Blue Line, which lay under Tyne Cot; a line that corresponded to the approximate position of
the Old British Line of 1914 and the enemy Flanders I line. Perhaps reflecting on the inexperience
of 3/Division, Monash gave his battalions two intermediary objectives so allocating one objective
to each battalion, who were to leapfrog through.
As a result of the Conference, the battalions of the 11th Brigade attacked with three
companies in front and one in reserve. Waterman argues that may have been an adaptation to the
type of ground to be covered. Forward troops would continue the advance as rear troops mopped-up
strong points. With the sufficiently narrow boundaries, this could be done on a company level.
Aerial photographs, to help planning, were not available until at least 26 September. As Monash
did not visit the front, plans were devised from his mental image of the map terrain. Whilst the
Gravenstafel would be attacked following a third leapfrog, Monash was the only one of the four
ANZAC divisional commanders who prescribed intermediate objectives, conforming to the principles
of the 31 July conference. The attack was thus broken into three shorter battalion steps with
enough reserves to provide reinforcements. The fourth battalion would be able to reinforce against
counter-attacks. Monash was concerned by enfilading fire from the flanks, particularly the machine
guns and pillboxes along the railway and at Daring and Dash Crossing.
The Artillery Plan
The most significant logistic problem was the movement of the crucial artillery support
requiring the Australian artillery to move forward, replacing V Corps’ artillery, some 1000 to
1500 yards along the plank roads, from their positions of 26 September, in a short time period.
Broodseinde Ridge was to be a different artillery battle from Polygon Wood and Menin Road. It
was assumed the Germans were to expect a third battle and therefore, to gain surprise, there
would be no preparatory bombardment to alert the enemy and maintain surprise. From 27 September
1917 to disguise the hour of the attack, the normal counter-battery and strong point work took
place with irregular twice daily practice barrage delivered.
Zero Hour was designated as 6.00am on 04 October 1917 with the troops following a carefully
timed creeping barrage that governed the pace of the attack. It would pause at the Red Line to
allow the infantry to catch up, mop up areas of resistance in their rear areas and reorganise. In
the case of 11/Brigade, this was a longer pause of twelve minutes to allow the New Zealanders on
their left to negotiate the marshy ground.
II Anzac Corps boasted 227 heavy artillery pieces, involved in counter-battery and strong point
destruction, and 384 field artillery pieces providing the creeping barrages for infantry support.
The infantry were also supported by Vickers heavy machine-guns. CEW (Charles) Bean, the Australian
official historian, estimated the concentration of guns in the I and II Anzac Corps fronts to be
one gun per five yards. With some guns being out of action, this ratio was in fact lower, but
still greater than the one gun per 15 yards on the first day of the Battle of the Somme.
1805info8g, sheet 3
Above: 3rd Div barrage map Source: AWM4 1/46/2
part 2 p.13
The creeping barrage was crucial to the advance. At Zero Hour the barrage would fall 150 yards
in front of 43/Battalion who were taking strict cover behind the taped forming-up line in the lea
of Hill 40. The barrage advance at three minutes past zero at a rate of 25 yards per minute for
eight minutes. It was then to advance to the Red Line at a rate of 100 yards in six minutes. The
barrage would reach the Red Line at 6.53 am and would form a protective barrage for 42/Battalion.
At this point four smoke shells were fired to indicate a protecting pause until 8.10am. Four
minutes before it was to move, the barrage would intensify, signalling 41/Battalion to advance to
the intermediary Blue Dotted Line. AT 8.10 it would move forward, reaching the Blue Line at 8.46
where it would form a protective barrage which would fall 200 yards in front of the objective
line. The protective barrage would remain in place while the 44/Battalion consolidated the Blue
Line, with out-posts pushed out 100 yards ahead of the line. The artillery would ultimately cease
at midday, 360 minutes past zero
The German perspective
On 30 September, the German Fourth Army Commander, General Sixt von Armin, changed the new
practice of 'defence in depth' and the lightly manned 'outpost line', supported
by shell-hole machine-guns and pillboxes. He ordered a partial return to holding the forward
positions in strength with additional machine-guns and launching from them deliberate counter-
attacks:
The losses incurred [will be] no heavier than those incurred when lying
inactive under enemy fire, the enemy must hold his forward zone in great strength and thus
provides a better target for our artillery. 3
On 1 October, Plumer's headquarters had forecast a counter-attack to be launched from
Broodseinde within the next two days to retake some of the ground lost in the Polygon Wood
attack.
It had still not occurred when Monash advised his brigadiers on 3 October
of the action they were to take if the Germans attacked next morning shortly before zero hour. A
defensive barrage would be brought down immediately while the infantry, 'sitting tight'
on their start-line, engaged those Germans who penetrated it.’ 5
1805info8g, sheet 6
Weather
The common perception of Third Ypres is defined by rain and mud. However, the weather of late
September and early October fluctuated between fine and warm to overcast days with slightly cooler
temperatures but with the rain holding off. The troops moved forward in warm weather. However, on
the evening 03 October, the rain that the planners had dreaded, broke with the subsequent
downpours justify the decision to bring the attack forward by two days.
Rain fell on 2-3 October and on the night before the attack, making the area behind
Monash's jumping-off tape marshy, but he had foreseen the possibility and ordered the
construction of seven crossing points over the Zonnebeke valley marsh, along the two taped and
duck boarded tracks. 6
End notes
Pedersen p.188
ibid p.189
ibid p.190
ibid p.194
ibid p.195
ibid p.194
1805info8g, sheet 5
Formations Move - The approach march
The most significant logistic problem was the movement of the crucial artillery support
requiring the Australian artillery to move forward, replacing V Corps’ artillery, some 1000 to
1500 yards along the plank roads, from their positions of 26 September, in a short time period.
Wednesday 25 September 1917
Our rest came to an end ... when we marched out of Blairingham.
Thursday 26 September 1917
We proceeded the next day to Eeke ...
On the day before Major-General Sir Alexander Godley’s divisional conference
of 26 September, elements of II ANZAC began to move forward. This move had
significant logistical problems necessitating noticeably longer and more detailed
operational orders than I ANZAC. Additionally, II ANZAC had the more difficult
terrain to negotiate over the battlefield of the attack of 26 September. Shelling
had turned the borders of the Steenbeek and Zonnebeek to swamps, necessitating
Australian Divisional Engineers extending plank roads with seven duckboards crossing
on the approach march.
Friday 27 September 1917
... and continued our march to Poperinghe, which place we eventually
reached on September 27th.This last day was very trying, for the weather was hot and
very dusty. It was a bad day for marching, so we were very glad when we last made our camp, near
the Railway Depot, one mile east of the town.
Saturday 28 September 1917
On 28 September 1917, 11/Brigade was based at Brandhoek No.2 camp 1, half way
between Ypres and Poperinghe, with a strength of 95 officers and 2280 other ranks. 2
Next day, the 28th, we were again bombed, and again, on the 29th, hostile
aircraft dropped bombs throughout the night, which inflicted heavy casualties, especially on the
11th Brigade Machine Gun Company, among whom were many former 42nd Battalion men. 3
Bean observed after passing the 11th Brigade on 28 September:
'The 3rd beside the 2nd and 1st will make a splendid combination all
keen to win and keep their reputations and their place in the force. It will bring the 3rd
Division among their fellows at one step'. 4
Sunday 30 September 1917
Temperature 67°F. Clear sky no rain. Note: these weather
conditions were ideal for tanks.
1805info8g, sheet 6
Monday 1 October 1917:
Our strength at the end of September was 43 officers, 978 other ranks. We
were bombed again on October 1st, causing us further casualties. (Brahms)
Communications from 3rd Australian Division to 11th Brigade to 42nd Battalion.
Menin Gate appears to be the only suitable crossing over Canal east of
YPRES. Could CRE [Canadian Royal Engineers?] put an infantry bridge 50 to 200 yards south of this
crossing. - Brig. General Cannan Commanding 11th Aust. Inf. Brig.
Kindly make arrangements to dump packs and kit you require to leave
behind at Brigade Stores at 59 Rue d'Ypres tomorrow morning 2nd instant. - Staff Captain 11th
Aust. Inf. Brig.
Source: 11th Brigade War Diary, The National Archives, (TNA) WO95/3425
Above: A schematic map showing the battalions route march to Poperinghe,
using best guess routes and modern town sizes. By modern road this is a 37km march.
Note: The spellings of Blaringhem and Eecke are from the Michelin Tourist and
Motoring Atlas 2004.
Monash, commanding the 3rd Australian Division, wrote home from a dugout close to the Menin
Gate in Ypres on 1 October:
'Difficult as it is to convey any idea of the destruction of Ypres,
it is simply impossible to describe the life and turmoil in the whole area, from Poperinghe
forward through Vlamertinghe (also destroyed) and Ypres, as far as our present forward position.
It is one enormous medley of military activity of every conceivable description, and the traffic
on the main roads is simply incredible … streams of men, vehicles, motor lorries, horses, mules,
and motors of every description, moving ponderously forward, at a snail's pace, in either
direction, hour after hour, all day and all night, day after day, week after week, in a never
halting, never ending stream.' 5
1805info8g, sheet 7
Right: Aerial photograph of Ypres (Autumn 1917) showing the route past the
Cloth Hall, the Grote Markt and leading to the Menin Gate in the top right corner
Tuesday 2 October 1917:
On the afternoon 2nd October the Battalion entrained at POPERINGHE and detrained at
the ASYLUM YPRES and bivouacked east of YPRES near the MENIN GATE during the night of
2/3rd October and the day of 3rd October.
Source: 42nd Battalion War Diary - Report of Operation for period ended October
2nd 1917 AWM 4 23/59/12
Reaching there, we bivouacked at a location near a cemetery a little after midday.
(Brahms)
Right: Troops in
transit at Poperinghe Station 30 September 1917. Note the 'slouched hats'
of 3rd Division troops in the centre foreground. Source: Imperial War Museum
(IWM) Photographic Archives Q 3965
1805info8g, sheet 8
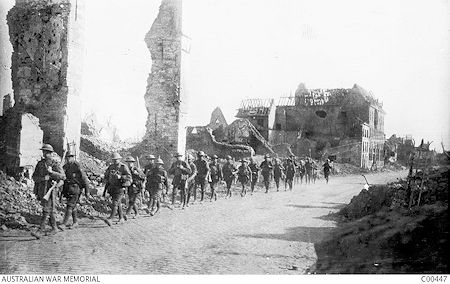
The 42nd's progress through shell-torn Ypres to their final bivouac
When the 5th Battalion passed through the city it was
...'
a grim example of the horrors of modern war. Formerly a
prosperous city, whose architectural beauties alone were enough to make it noted, it
was now nothing but a devil's dustheap. There was not a building, public or
private, that had not been hammered and blasted to a shattered ruin of tottering
walls, or lay so much more cruelly smashed that nothing but a heap of stones and
splintered timbers littered the spot where once it stood.
Right: Ypres Centrum April 1915 showing 42/Bn's route
from south to north-east passed Cloth Hall and Grote Markt April 1915 Source:
AWM A02454
In this city of crumbling stone, the German shells still whined and
crashed, grinding to finer pieces the ruin they had already achieved. Ypres was very unsafe, even
in the crypts and cellars that sheltered most of the troops, and the vicinity of the railway
station and Lillegate was always most unhealthy by reason of the shelling that these places
constantly received.
Around and in the city were other signs of the bloody and desperate
fighting of which it had been the centre. The graves of Hun and Briton were so many thousand
separate proofs, if such had been needed, that War had passed though this place.' 6
The 41st would
'... never forget one's first impression of the most historical
city of the war Ypres. This was the first large town we had seen the victim of "Kultur",
and even the first dreams we had of this place, when we heard it was to be our fighting sector,
did not come up to reality. Ypres, with its silent streets and stricken houses, which once
throbbed with the life of a laughter-loving people, will for ever remain in our memories. It
stands a monument for all time to the thousands who lie round it beneath little white crosses;
they who, by their noble self-sacrifice, prevented the enemy from ever treading its streets.' 7
1805info8g, sheet 9
Top row left to right 1: The heavily shelled Ypres Asylum 1915 2: A period post card showing the burning Cloth Hall Second row left to right 1: Ypres Asylum 2007. The pre-War buildings have
been incorporated into the modern H.Hart Psychiatrisch Ziekenhuis
2: 'Left wheel' opposite the railway station into Cloertplein 3: Boterstraat 4 The rebuilt Cloth Hall and Grot Markt 2007 5 The modern Menin Gate, unveiled in 1927, where 54,900 names of The
Missing are carved.
Top row left to right 1: The modern railway crossing 2: The shell damaged Ypres Station date unknown Source: IWM Q.17,304 3: 'Right wheel' at the corner of Fochlaan 4: Looking along Fochlaan to the station 5: The turning into the 43rd Battalion's bivouac. There was
no obvious turning to the area where the 42nd bivouacked at
28NW4.I.9.a.8 Second row left to right 1: The remains of the Ypres town moat. Beyond the 1917
bridge was the sign 'Tin hats to be worn beyond this point' 2: Gustave de Stuersstraat
Source of map: 11th Brigade War Diary, TNA
WO95/3425Photos: Mostly author 2007
Click on the map or any of the images to load a larger image, generally
700x525 pixels, in a new window.
1805info8g, sheet 10
Above: A modern town map of Ypres showing the route followed by
the 42nd
Above: Trench map locating the Ypres bivouac area I.9.a,
marked grey Source: Zillebeke 28NW4 Trenches correct 25-1-17
1805info8g, sheet 11
Wednesday 3 October 1917: Establishing the line at Zonnebeke
Temperature 64°F. Overcast skies resulted in 1.2mm of rain. Source:
All weather: McCarthy, 1995
On that day, the men were thoroughly briefed on their tasks for the attack a were issued and
every soldier was fully equipped ammunition, grenades and sandbags. The weather was uncertain,
and the slight misty rain in the afternoon of 3 October gave some warning of the difficulties to
be faced. The twice daily preliminary bombardment, had consisted largely of practice barrages
which, from 1 October, churned the ground of the attack and the area beyond.
From the 27 September the ANZAC pioneers and engineer had been engaged in extending
the duckboards along the tracks for the approach march, but these ended before the front
line. There was no time to plank the artillery road or lay the all the telegraph wires.
The start of the attack depended on how quickly the II ANZACs, with short notice of its
task, could be brought up to the front and to make their preparations.
The map on the right shows the tracks leading to 11th Brigades assembly point in
preparation for the attack of 4 October 1917. The assembly points are marked by parallel
lines, with 11th Brigade on the right flank.
Although 'Jack Track' was constructed after the battle, perhaps because of the
German bombardment at 05.30am, it connects with 'F' Tracks, which in turn leads
to the 42nd Battalion's overnight bivouac. It is possible that 'Jack Track'
was built on the original track. The assembly position was still reached by a '
corduroy road' of logs making a 'causeway over bog'.
The Artillery Road marks the line of the Ypres to Roulers railway.
Click on the map to open the full 72kB A4 landscape map, which extends from the
outskirts of Ypres, linking to the map in 1805info8g, to Tyne Cot.
1805info8g, sheet 12
On the afternoon of 03 October, all leaders and guides reconnoitred route with
maps produced by Captain Dunlop. 9 From the bivouac area they moved along
the duckboard tracks to the assembly trenches led by a battalion intelligence officer
under the supervision of the engineers and pioneers. While the duckboards assisted to
a degree, there was insufficient time to build these walkways all the way to the
front line. The remaining track was marked by thick white tape on the route the
battalion would traverse on the night of 3/4 October.
Above: A photograph of the start-line tapes, dated 4 October 1917
Source: Imperial War Museum (IWM) Photographic Archives Australian collection,
access number unknown
3/4 October 1917
Time was taken to rest, equip and prepare before moving into the line that night under cover of
darkness. The night was initially cloudy, the moon obscured and providing minimal light; there
was a little light rain making the ground behind the front line passable but swampy. With Zero
Hour approaching the 11/Brigade began to move forward with 43/Battalion moving
first at 9.00pm 10 over the difficult ground to man their jumping-off positions in no
man's land. The 39/Battalion's history recorded: 'Here
the duckboards ended, and the only track was a narrow, dimly-seen path winding between water-
logged shell craters. The ground was very muddy and slippery, and the darkness added to the
difficulties of the march. Now and then a flare from the trenches lit up the country for a few
seconds, disclosing a desolate waste of mud and shell holes, with here and there a splintered
tree, the only sign of vegetation in that wilderness.' 11 The Zonnebeek, as a
modest stream, had presented a minor obstacle but was now a liquid morass with the effects of
artillery fire, which had churned up the ground making it difficult to traverse. The value of the
thick white tape became evident. Once across the Zonnebeek, divisional pioneer guides led
companies to their precise location on the start-line arriving at 1.50am.12
The approach march is described in the unit history of the 41st Battalion.
At 11 p.m., after a hot meal, the advance march began. Picking our way
amongst the debris and shell-holes along the railway embankment, under desultory shelling, we
reached the viaduct. Here we had to lie up for an hour while assembly-tapes were put out. The
front was by no means quiet, and this hour, spent under continuous shelling, is numbered amongst
the longest ever passed by many. At length a further move forward to Bremen Redoubt was made, and
although the assembly-place was here, it was thought inadvisable to stay, so we moved across the
Zonnebeke River. In crossing we had at least thirty casualties. We had to run the gauntlet of a
heavy area shoot on the three duckboard bridges which spanned this waste of mud and water, and two
out of three were destroyed under our feet. Shelter was taken in shell-holes in rear of the three
battalions who were to take the first three objectives. Our role was the taking of the fourth and
final one. 13
The 44th found the approach as difficult:
1805info8g, sheet 13
When the head of the column (and 700 men in single file on a dark night
form "some" column) reached the Zonnebeke it was found that the duck-board bridge over
it had just been shot away. There was nothing for it but to sit the Battalion in their tracks
while the guide found another crossing. After an hour's search in the darkness and mud,
another bridge was found closer to the railway line, and by 2 a.m. on 04 October the whole
Battalion was assembled in its allotted position. 14
At Zero minus 6 hours 30 minutes, 42/Battalion waited until nightfall to move into the line
along the southern track marked with ‘J’ 50-100 yards north and parallel to the Ypres-Zonnebeke
railway line. 15
At 10pm on the night of October 3rd the approach march began.
We found marching a very difficult performance owing to the several sharp showers which had
rendered the ground sodden and sticky and made visibility very poor. Fortunately the route [The
Battalion map above suggest this was 'F' track] was marked by tapes, white posts, and red
lights, and these were more or less discernable in the dark. 16
The full moon was hidden, and, from the point where the duckboards ended
the tracks, although excellently marked with tapes and stakes, were difficult, especially in the
Zonnebeke valley, which lay close behind the jumping-off tapes. Engineers had bridged the swampy
beds at seven points with duckboards, but some of the crossings had been destroyed by shellfire
leaving men and equipment to struggle through the bog. The approach of the 3rd
Division was under direct observation of the Germans, on the close-by Windmill Cabaret Hill [Hill
40], who were constantly firing white flares and coloured signals and delaying the approach.
The stepping-off point was based on the trenches created after the
attacks of 20 - 26 September, facing the German lines north-east of the Zonnebeke to Langemarck
road. Dochy Farm New British Cemetery, the site of Van Isackere Farm, was in No Man's Land and
Dochy Farm part of the German front line.
They were to leap frog through 43/Battalion behind the creeping barrage to capture the first
intermediary objective of the Red Dotted Line. John Henry's 'A' Company, No. 4 Platoon and
Corporal D Bowden's section began to move forward between 21.00 hours and 22.00 hours. The II
Anzac faced two serious obstacles. First the Zonnebeke valley, and then, beyond the Zonnebeke-
Langemark road, the shallow basin of the Hannebeek. Both were quagmires, and both were subject to
almost permanent shellfire.
The battlefield
Right: An annotated and composite aerial photograph of Zonnebeke taken
before 1914
Click on the image to open the original A4 landscape
Source: Bostyn 2007
1805info8g, sheet 14
The space for the 11th Brigade's assembly ahead of the Zonnebeke was so narrow the
41st Battalion, destined for later objectives, assembled besides Brigade
Headquarters 1,200 yards in rear.
Right: Zonnebeke station 1913, which featured in the attack
Conscious of the falling German artillery behind them, the supporting battalions of
11/Brigade assembled, in the lea of Hill 40, closer to the front line than intended,.
Being out of sight of the Germans prevented them from being seen as a fresh
concentration of troops that would suggest an imminent attack and bring down an
attack breaking artillery barrage causing casualties. They waited until Zero Hour on
oozy soil, in the early October drizzle as a strong westerly wind cool them chilled
them to the bone. Then, suddenly and unexpectedly, at 5.35, German artillery shells
began to fall around them.
Because of constant German barrage the 41st moved forward and squeezed behind 10
th Brigade. 17 By 03.00 the approach march was completed. ‘Trenches’ were
shell holes around a pill box captured earlier 27 September, 200 yards from the front, near
Zonnebeke station.
End notes
3/Div HQ War Diary AWM3 1/46/12 Part 2 p.25
ibid p,27
Brahms p.47
Pedersen p.189
Evans pp.106-7
Keow p.239
MacGibbon p.61
11 Brigade War Diary, October 1917 p.16
11/Bn War Diary AWM4
23/11/11 p.29
3/Div HQ War Diary AWM3 1/46/12 Part 2 p.31
Westermann p.73
ibid p.74
MacGibbon p.62
Longmore p.99
ibid p.28 Map reference I.11.b.05.90, where No.2 mule track meets Cambridge Road. However
this doesn't correspond to the routes drawn on the artillery map above. The track 50-100m
north of the railway would be 'F' track leading from 42/Battalion's bivouac to
their assembly point.
Brahms p. 47
Bean p.841
1805info8g, sheet 15
Sources:
Bostyn, Franky, Passchendaele 1917, the story of the fallen and Tyne Cot Cemetery,
Pen and Sword Military, Barnsley, 2007
Brahms, V, The Spirit of the Forty-Second, 42nd Battalion AIF Association, 1938
Evans, Martin Matrix, Passchendaele, the Hollow Victory, Pen and Sword Military,
Barnsley, 2005
Longmore, Captain Cyril, Eggs-a-Cook the story of the Forty-Fourth, War – as the
Diggers fought it, Colortype Press, Perth, 1921 Reprinted: Naval and Military, Uckfield,
Sussex, 2010
Keow, AW, Forward with the Fifth, Naval and Military Press, Uckfield, East Sussex,
Reprinted 2009
MacGibbon, Frederick William, The Forty-First being a record of the 41st AIF during
the Great War, Australian Commonwealth Military Forces, 1919 Reprinted: Naval and
Military, Uckfield, Sussex 2010
Pedersen, PA, Monash as Military Commander, Melbourne University Press, Carlton,
Victoria, 1992


showing the route
past the Cloth Hall")


